Monday, June 30, 2014

More thoughts on garden envy

In my last post, I lamented how I feel like my garden is behind everyone else even in my zone. I got a few comments telling me not to compare, as there are a lot of variables. This is true. "Zone" refers to the USDA Plant Hardiness Zone map, and really only categorizes average annual minimum winter temperatures. Another important variable is length of growing season, which I think has more effect on vegetable gardening, since few vegetables are true perennials that you have to worry about over-wintering. Of course minimum temperature and growing season are related, but not exactly causally.

We just returned from a short trip to Boulder, Colorado, for my niece's wedding. The parents of the groom hosted two lovely events at their beautiful home in the country outside of Boulder. Of course I was immediately drawn to their vegetable garden. It is so much more advanced than mine! But that is not surprising, since they started planting in March, and I barely had anything in the ground in late April. Imagine my surprise when I plugged their zip code into the USDA map, and found they are in exactly the same zone as me, 5B!


They are swimming in beautiful summer squash, while mine barely have 4 leaves.


Their beets are the size of baseballs, while mine just have taproots.


Carrots are huge, mine tiny.

 
Their tomatoes look like mine in August.

 
Onions dwarf mine.
 
 
Their kale does not seem to mind the 90 degree weather. I wonder if I can grow California poppies?

 
So I'm going to think more about the variables other than zone. It makes sense that no matter how cold it gets in the winter, it is important how quickly winter goes, and how soon it arrives.


Monday, June 23, 2014

Harvest Monday - 23 June 2014

I'm not griping, mind you, but I feel like I'm weeks behind other gardeners, even in my zone or close to it. I mean, I'm in Zone 5B. That's supposed to be more 6-like than 4-like, right? And I'm only maybe 45 miles from the garden of the hostess of Harvest Monday, Daphne.

But she, and Our Happy Acres, and Diary Of A Tomato, and Seeding The Good Life, and Grow A Good Life, and Simple Garden Made Easy, and Mike's Bean Patch...the list goes on...all apparently have a similar climate, and all seem to be light years ahead of us, harvesting much more good stuff. I wish I knew why.

But we are finally harvesting some things anyway. We get nearly daily pickings from the lettuce and spinach in this bed:

Enough for salads every day, and spinach for the freezer. The spinach is starting to bolt, though. In a few days we should be picking the snow peas behind them. As with all the beds directly sown this spring, germination was spotty.

One bright spot has been broccoli. The early variety Blue Wind gave us 3 heads this week, with this one the largest:


We've got 6 Arcadia and 6 Fiesta teed up--the plants are very healthy but the heads are still very small. I think not practicing pure square foot technique here made a difference--one every other square instead of the recommended one per square.


Another bright spot is the bed of onions and potatoes. This is the first time I've tried to grow potatoes, and the results so far seem to be great. They are putting out flower buds.

 
And I have yet to see a Potato Beetle. But we do have a few similarly marked Striped Cucumber Beetles punching holes here and there. Nothing to worry about, so far.


It's kind of strange, but last summer I planted a few squares of kale (Dwarf Blue Curled). They never amounted to anything by fall; just a few inches tall. I covered them with a cold frame anyway, and when I uncovered them in the spring they looked almost dead, and of course no bigger. That bed was one of two I am resting this year, so I planted a cover crop of field peas. The peas grew quickly, and for some reason, the kale decided to grow too. So we were surprised to find usable kale when we went to chop down the peas this week. We took it all.


Enough for a meal, anyway. Here's what the beds look like. Their frames have rotted, so now they just look spooky. That's another project...


We continue to have a bumper crop of tarragon and The Kitchen Goddess is putting it to creative use beyond just drying. Here is Tarragon - Chive Flower Vinegar before...

and after.

And here's tarragon compound butter, in the freezer now just waiting to be applied to sauces or our first baked potatoes!


In the spirit of sharing how we use our harvests, our Saturday night dinner was green salad and grilled venison tacos, with all components (except the cheese, which we haven't gotten involved in yet, and the tortillas, which we could but were too busy to make ourselves) coming from our own hands. And paired with a half-bottle of our own Black Rot Wine--so called because that fungus decimated our vineyard last year and we were only able to salvage a few grapes. It's been bottle-aging since fall, and when we opened it up (first time), surprise! Bubbles!! How did that happen?


Now for an update on the progress of "The Survival Garden," introduced here. The Red Flint corn is up and thinned, and the two varieties of dry beans are up as well, though only about 75% survived whatever ate the seedlings. The pumpkins are doing all right, too.

It's not a true three-sisters garden, or if it is, it's the three sisters that don't get along.


So that's it for this week. I would like to thank The Kitchen Goddess for pitching in and shouldering all the burden of garden chores this week while I was out of commission with an injured back.

Happy harvests to all!

Monday, May 26, 2014

Harvest Monday - 26 May 2014 - Plus Introduction To The Survival Garden

It was a tough winter here, and it's been a challenging spring. For the longest time it would just not get warm.

The normal spring plantings of peas, radishes, lettuce, spinach, carrots, and beets have all struggled, with especially low germination of the peas. Very disappointing! Here it is late May, and all we really have to show for this Harvest Monday is a picking of radishes:


That's spicy Cherry Belle on the left, and milder French Breakfast on the right.

Three years ago I put in a 12-foot row of asparagus in the main garden, with dreams of a lifetime of harvests. Something went wrong though. It appears voles tunneled in over the winter, and destroyed the roots of most of the plants. We got only a tantalizing few spears. I ripped them out, and have replanted with Jersey Knight crowns. So I have to wait again, and I'm not getting any younger!

Over in the Kitchen Herb Garden, the woody herbs like thyme and sage fared poorly over the winter, so I ripped them out and started over. The lavender failed to make it again, so I've given up on it. However, the tarragon, which dies back to the ground, has been a rare bright spot.

Here's what the herb garden looks like this morning:


It's planted with Italian parsley, cilantro, basil, thyme, oregano, dill, rosemary, chives, anise hyssop, sage, winter savory, catnip, garlic chives, lady's mantle, echinaea, lovage, St. Johnswort (looking to become invasive), and tarragon.

We've cut back and dried the chives and tarragon several times. Here's a picking of fresh tarragon that was used in a delicious tarragon chicken dinner:


Now I'd like to turn my attention to a new project here at the "farm."

Growing vegetables is great. And preserving your harvest by freezing or canning is also great. But those processes take energy largely derived from fossil fuels. What would we do in a protracted grid-down situation, a possibility in my opinion?
Dry field corn for grinding, and dry beans, are an answer. I’ve never grown either of them. So I thought I’d experiment with what I’m calling “The Survival Garden.”
Out in the field is the site of an above-ground swimming pool that long-ago owners installed and removed at some point. Now it’s just a scar on the land; a weed patch. But admittedly it was a convenient place to burn brush and yard waste. It even has nearby water and power! The total area is about 525 square feet, if I do my area-of-an-ellipse math correctly. 
 
I had ideas of using it for a landscaped area—waterfall, tranquility garden etc. But it is a little too far from the house for that, never mind the expense.
So I developed the idea to turn it into a crop area. If I grow tired of the experiment, I can plant a nice-sized vineyard there, or landscape it, or just let it revert to grass and blend in with the rest of the pasture.
I calculated I would need about 16 cubic yards of screened loam (pronounced “loom” in these parts for some reason). I shopped around a bit and found a place that sells a screened mix of 50% loam and 50% compost, tested by the University of New Hampshire for pH and lead contamination. They agreed to deliver it for $390. It’s not a small sum, but is one of those amortizable expenses.
On Monday, May 19 2014, a huge dump truck showed up. He negotiated the gates and drove onto the pasture, making significant ruts. With a load that weighs 24 tons, plus the massive vehicle, ruts were to be expected, but it saddened me. Sooner or later they will smooth out.
Here he is dumping the load in the center of the plot: 
 
And here is the resulting heap:

 
Beautiful dirt, isn’t it? But I gulped, as it was going to be a daunting task to spread out by hand. Plus it looked like twice what we needed.
Surprisingly, in 3 afternoons, with The Kitchen Goddess doing much of the work, the pile was spread out. After compacting halfway through, the result looks like just the right amount.


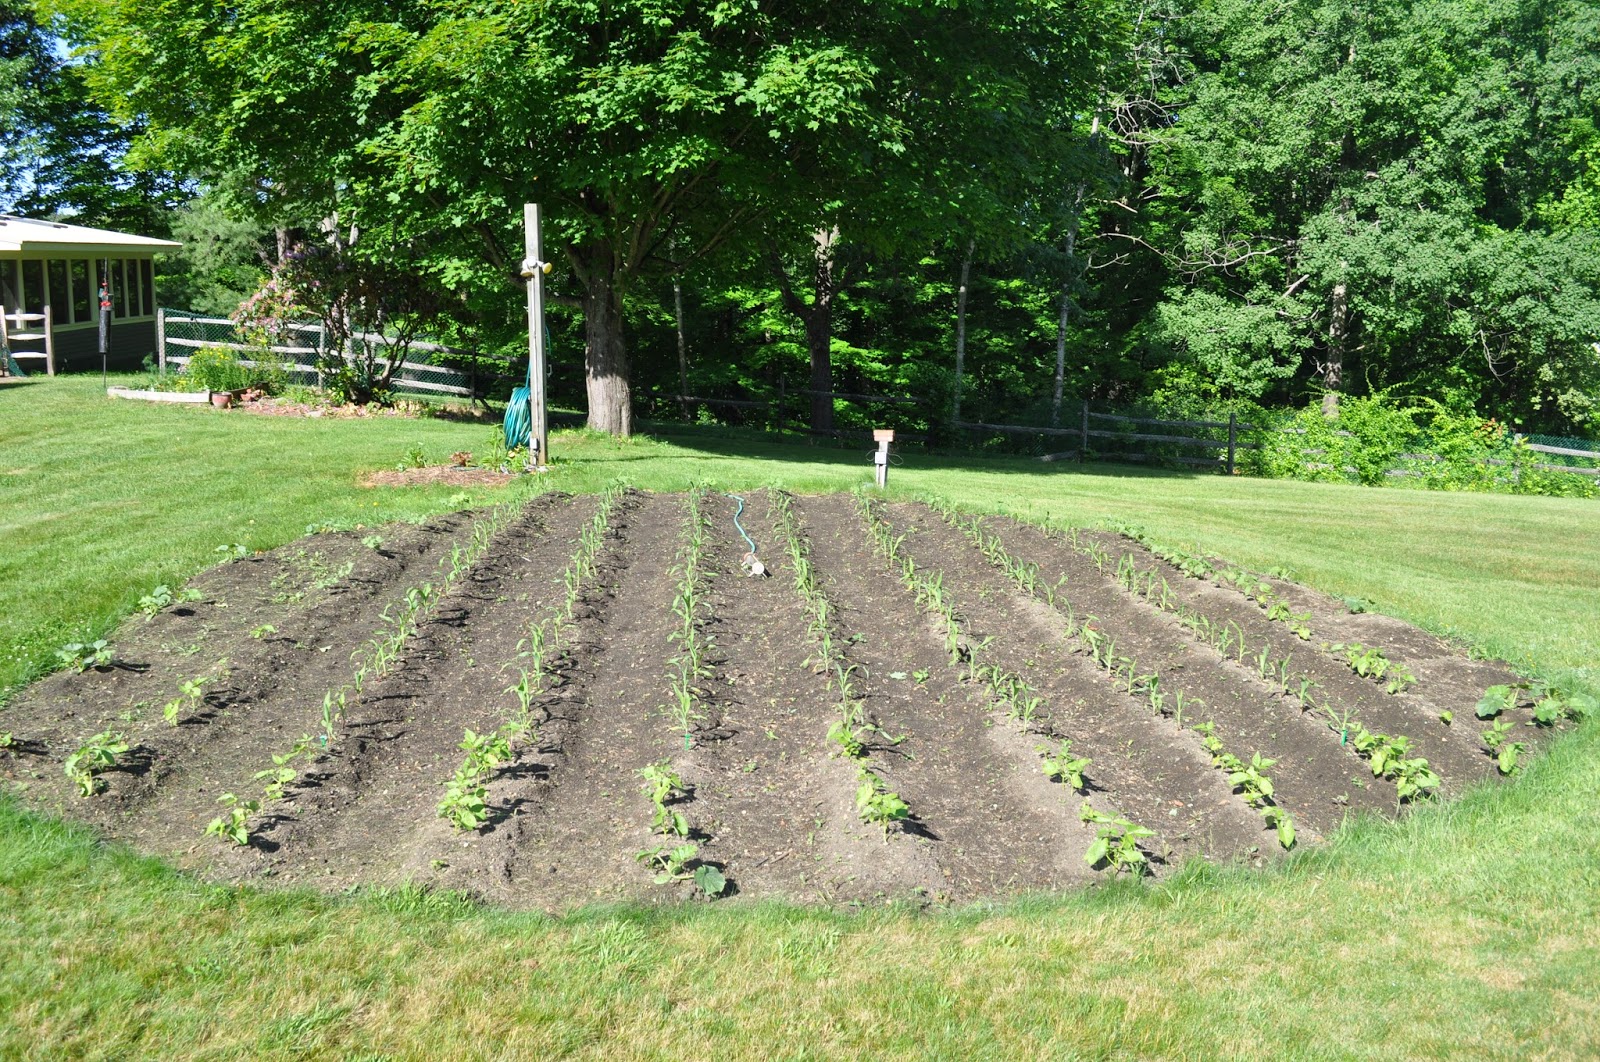
Here it is as of this morning all furrowed and planted:


Yesterday I did the planting, which turned out to be two hours of pure stoop-labor. It gives you respect for the old-time farmers and the Amish. I planted seven 20-foot rows of Floriani Red Flint corn, with the remainder divided between Kenearly Yellow-eye and Midnight Black Turtle beans, all from Fedco. Also, pumpkins along the outer edges.

I will keep you posted with the progess as the season goes on. Meanwhile, head over to our hostess's site, Daphne's Dandelions, where hopefully the better-gardeners-than-I have lots of beautiful harvests to show.

Monday, April 28, 2014

Harvest Monday - 28 April 2014

Okay, no harvests, other than a handful of chives. But last evening, a reward of a different kind:


I had lofty ambitions for the weekend, but it was rainy and cold both days. This has been a very slow spring. I feel like everything is at least 10 days behind. This morning, there is frost on the roofs, but fortunately not at ground level. Most everything is somewhat protected by row covers anyway.

The peas and radishes I planted on April 13 have emerged. In the same bed are lettuces and spinach. I can't tell without removing the row cover if they have sprouted. The onion sets I planted on the same date are also poking up.

On Friday I set out 16 broccoli plants, again with a row cover. They should be OK. I also planted potatoes, and set out the artichoke plants. One of them has disappeared, as if abducted by aliens. Very disheartening. A local nursery actually has artichoke plants, which is very uncommon in these parts. I may have to purchase one or two.

I was going to plant carrots and beets this weekend, but planting seeds in the rain is foolish. Hopefully I'll have the odd hour or two this week to do it. Again, everything seems 10 days behind, which is frustrating.

Still, we must be of good cheer. The warm weather will arrive eventually. And what is more cheerful than a double rainbow over your barn?


The end of the rainbow looked to be in Farmer Ball's field across the road!


If you're not already there, head over to Daphne's Dandelions, the gracious hostess of Harvest Monday, and see real harvests and tons of gardening tips.

Sunday, March 30, 2014

Harvest Monday - 31 March 2014 - Sugar Time (Final)

Welcome to Harvest Monday, brought to you by Daphne's Dandelions.

We did our final collection and boil of maple sap on March 12, and pulled the taps. Really, the season was just getting started, but we were leaving for our annual pilgrimage to beautiful Key West. Here is our total production for this year:


Pretty pathetic, compared to last year. Not even a full quart. But we're grateful for anything given this challenging winter and spring.

Before we left, I had given permission to the local high school's forestry/environmental sciences program to enter our property and tap the trees we weren't using. They tap a number of trees around the town (a few of ours in the past), as well as their own school grounds. The students get to keep some syrup and the school sells the rest.

They set up a dripline from 12 of our trees into this big collection tank:


This is the modern way. Just string 'em together and let gravity do the work. Then just pump the tank into the one in the back of the truck.


When we got back from vacation last Sunday, we found the kids had put up 45 additional taps using the old-school bucket method!

 
Some of the trees look a little too small to be tapped. I'll have to have a word with the instructor.

 
There can't be many tapping days left. Once the trees break bud you get "buddy sap" which has an off-flavor. But they're the experts, so I'm sure they know what they're doing

The school typically pays us back with a pint or so when they just do a few of our trees along the road. I wonder if they're going to be a bit more grateful this year! Just saying.

As the pictures show, the snow is mostly gone now. That does not mean I can do anything in the soil though. It's still frozen solid below the top one inch of moosh. First it has to thaw, then dry out. And the past couple of days have seen torrential rains--maybe helping with thawing but not drying! This is the brook on the adjacent property, which is only a trickle in summer:


At this rate, I worry that there won't be enough time to get a good pea crop before the weather gets too hot.

Still, there's some green! Here are my artichoke seedlings, looking pretty good, plus a pot of tiny rosemary seedlings.


Other seeds started now are broccoli (emerged already), eggplants, peppers, parsley, basil, dill, marigold, lettuce, and cumin. Also some perennials. More to come!

Speaking of Key West, I did not know that it's the only place in the continental United States that is Zone 11 (I'm in 5). It would be fun to garden (and live!) there, except for one problem...no soil! But beautiful (salty) water:

 
If you visit Key West, I highly recommend checking out the Key West Tropical Forest and Botanical Garden for plant and wildlife viewing. We did, for the first time this year, and really enjoyed it. I can't believe we missed it all the times in the past.


Monday, March 3, 2014

Harvest Monday - 3 March 2014 - Sugar Time, Part 2

The weather this week turned against us in our "small batch" production of maple syrup. Even daytime temperatures were well below freezing. This causes the sap flow to cease. The taps freeze up and plug. Driving around, I see very few taps on other properties. So us amateurs jumped the gun I guess.

We did do a boil of the 3 gallons of sap we got before the weather turned. Last year we did all boiling on the kitchen stove, which worked, but takes a long time, and generates huge amounts of steam. Ideally you would use a commercial evaporator that has a large surface area. But the cost of this is prohibitive for small-scale operations like ours. So we  bought a 100% redneck-approved propane-fired turkey fryer for this use.


It has a 36 quart kettle, and the burner really pumps out the BTUs. We do this outside for safety.

When the liquid has reduced enough to fit into a saucepan, we transfer the operation back inside to the gas stove, as it is easier to finesse the temperature for the final reduction. You want to bring it just to the boiling point of water (at your elevation), stirring frequently. If it gets any hotter it will start to crystallize. A candy thermometer is essential for this.

So we got just a half-pint out of this run. Here it is, on the right, compared to what is left from our last year's production (it stores fine in the fridge).


This year's is much darker in color; I really don't know why. Maybe the more-rapid boiling makes a difference.

And looking out, the weather pattern does not look very favorable. We won't have any days above freezing until March 6, and even then, not much above. Hopefully we accumulate enough sap to have another boil before we have to stop and pull the taps in mid-March, as we have a schedule conflict. The commercial producers will probably just be getting started then.

I hope there aren't fewer pancake breakfasts in the forecast!

Thanks for reading, and thanks to Daphne.

Monday, February 24, 2014

Harvest Monday - 24 February 2014 - Sugar Time!

Welcome to Harvest Monday, brought to you by Daphne's Dandelions.

This post may be drearily redundant to those familiar with the process, but for those who aren't, here is how we obtain pure delicious maple syrup from our own mini "sugar bush."

From a Sugar Maple (Acer saccharum), the typical ratio is 40 gallons of sap to 1 gallon of syrup. Thus, the sap is quite watery, and it takes a long time to boil down and concentrate the sugars.

Depending on tree size, you can safely have two or more taps per tree without causing the tree any harm. We are comfortable with one tap per tree.

Last year was our first, and we tapped two trees by the barn. We set the taps on Feb. 14, and removed them March 9. Over that time we got roughly 20 gallons of sap, which became 2 quarts of syrup. That is plenty for the two of us for a year. This year we are doing 4 trees for hopefully a shorter amount of time.

On a small scale, the cost of the equipment is very nominal. Per "tap," you need a bucket, a spout (called a "spile"--why they need a different word is beyond me), and a lid. A set costs about $11 and should last a long time.

The sap flows in waves, called "runs." In the late winter, if the days are above 40 degrees F, and the nights below freezing, you get a run. Otherwise the taps just sort of sit there.

This past Wednesday we tapped, as we were expecting 4 days of favorable weather starting the next day.

The first step, if required, is shovel a path to your trees! Lots of snow this year.


Next, choose your spot (healthy wood only, not near a tap from last year) and drill a 5/16" hole 1.5" deep, and slightly angled up. A piece of tape on the bit helps you get the right depth. Helpful hint: make sure your cordless drill is adequately charged!

 
Next, insert the spile. It should push in easily, maybe needing only a bit of encouragement from a rubber mallet.


Next, hang the bucket from the spile.


Next, attach the lid. This helps keep snow, rain, and bits of tree bark or lichen from getting in.


The lids are thin sheet-metal. I've found that attaching a C-clamp helps keep them from flipping up in a wind.


 Now wait for the drip drip drip!

We probably have 2 dozen sugar maples on the property, some of great size, and we could vastly increase production if we wanted to. No plans for that, however.

As I write this, it looks like the "run" will be over for awhile. This run was not a particularly good one (one of the days in the middle was colder than forecasted). We got about 3 gallons of sap--enough to start a boil. I'll show that process in another post.